

1.Overview
As a school owner, communication is at the centre of your daily activities. You have to communicate with your school stakeholders – parents, guardians and teachers in a bid to set direction, solve problems and work together on core initiatives. Occasionally, you also have to be in touch with your product suppliers and other associates to keep the school running well.
Having a smooth system of communication is vital to helping your school succeed.
The world of technology moves fast, and today there are more ways to communicate than ever before – SMS text has become one of the most versatile and convenient means of communication, but even that realm has been greatly expanded by a host of apps and tools meant to enhance or support the experience.
We (Bunifu Technologies) have come up with Sikizi – a desktop application – to automate the process of communication in schools.
Using SMS for alerts and notifications from Schools and other learning institutions are highly beneficial for keeping parents and guardians notified on student performance, upcoming exams, fee payment reminders, pocket money reminders, schedule changes and events.
2.System Requirements
- RAM: 1GB
- Operating System (OS): Windows operating system (windows 7/8/10)
- Applications: MS Office
2.1.How to create account for a school
To download the setup, visit our website https://sikizi.com and navigate to Solutions -> Sikizi for Schools.
Having downloaded the setup from our website, launch it and get started. Click on the get started button and create an account for your school. This will take few steps.
We will create an account for a school for example Green School.
Enter the code sent to you via SMS and click confirm button. You will be required to provide the school details you want to register. Click finish and then you will be needed to sign in to that account.
2.2.How to obtain your sender ID
SMS Sender IDs are characters configured by Telco’s that enable you to identify the sender of the SMS e.g. School name or company name. Sender IDs enables you to establish your brand and build trust with the receivers of the messages as they can be sure that the message originated from a specific institution /organization/company.
We (Bunifu technologies) will help you to obtain your sender ID from Safaricom Ltd. You will be required to fill a form with your preferred Sender ID name. The cost will be KES 15,000 for sender ID and configurations.
3.The Basics
There are a few things you need to note before we dive into using the application.
- Your excel file column names should always be capitalized to ensure good user experience.
- All students in your excel file should have a contact since the system is dependent on the contacts. In case of any empty field it should be replaced with a dash(-).
- You should always start by adding a students list with Name, ADM, Class ,Stream and parent/guardian phone.
- Columns should always be matched correctly.
4.Manage Students and contacts
4.1.How to add students
With Sikizi for schools, you can add a student alongside the parent’s/guardian’s contacts one by one or by importing them from an excel file whose template we have provided [check your Sikizi download folder].
Importing contacts from Excel
To do this efficiently, you need to understand how to prepare the contacts and finally add them to the system. These contacts will be retained in the system database and you can send any message to them.
- Login to Sikizi and on the left panel, click student details.
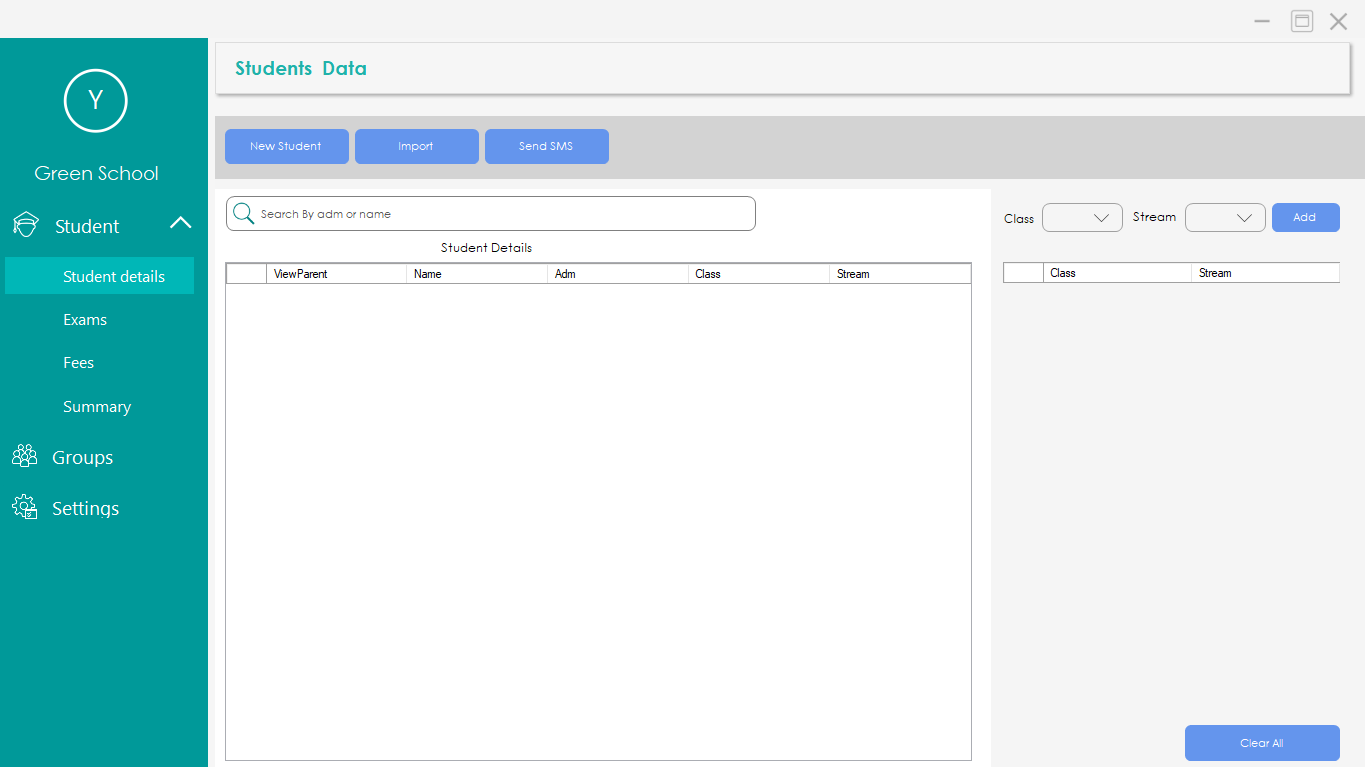
- Upon clicking the Student Details, you will see the expected columns [NAME, ADM. NO, CLASS, STREAM and PARENT PHONE].
- Prepare an excel file with these fields/columns and a list of the students you want to add to Sikizi. Below is an example of excel file.
Having successfully prepared the excel file, click import on the system and it will prompt you to choose the excel file which contains your contacts.
Open that file and Sikizi will need you to map your columns with those expected.
- Click finish upon matching the columns then proceed to click save on that window (upon verifying that the data imported is correct) in order to store your contacts in Sikizi contacts database.
Our student details have been added to the system and this is it.
4.2.Adding a single student at a time
Sometimes, you may not need to use an excel file and want to add contacts one after another. In this case, under the student details tab;
a) Click on New Student button.
b) Key in the Name, ADM No., class, stream and parent details of the student. Below is a screenshot of what you need to do.
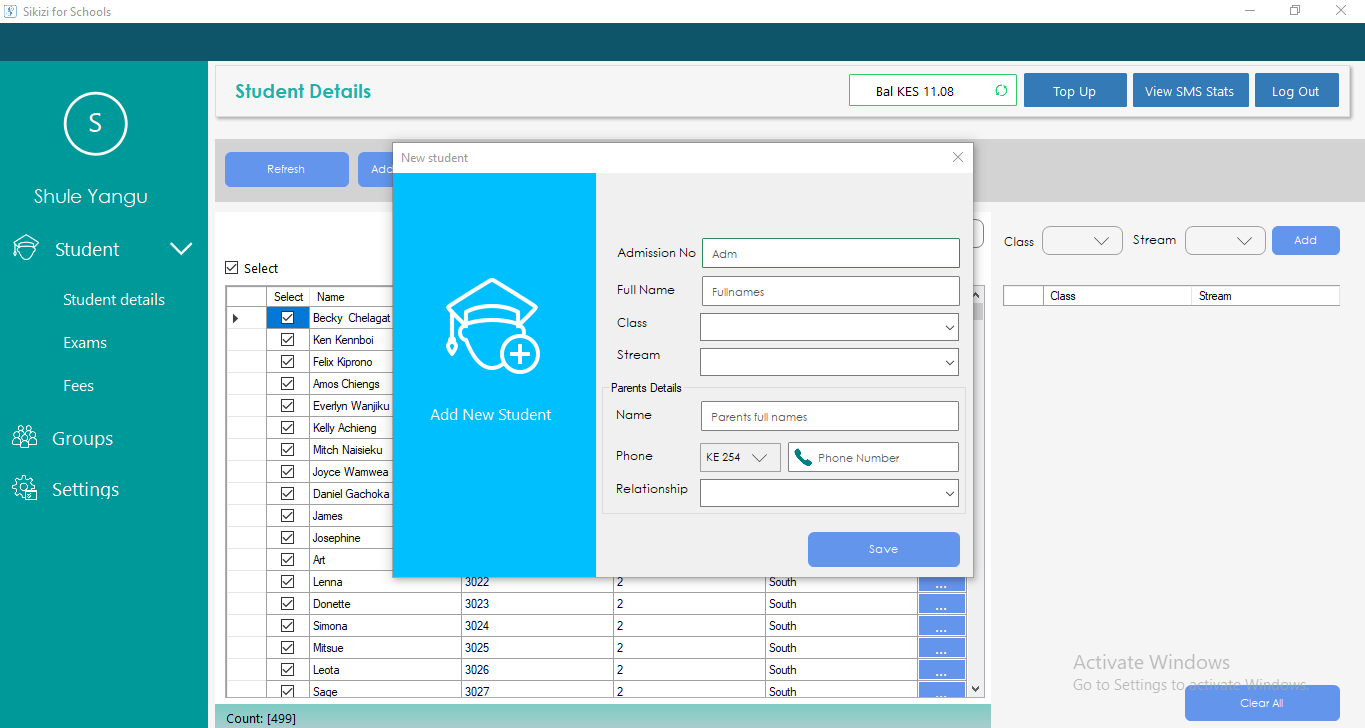
After filling all the fields that are required, click save and you will notice a new row added at the bottom of you students list.
4.3.How to edit student details
From the list of students we have added, we have a column named options. To edit a single record, click on that column and you will see a context menu with four options : view parent, edit record, send sms and delete record.
a) view parent: when you click this button, you will be able to view parent details, edit or add more contacts to that student.
b) send sms: you use this when you need to communicate to a single student(parents).
c) edit record: allows you to update student details in case errors were discovered after uploading your excel file.
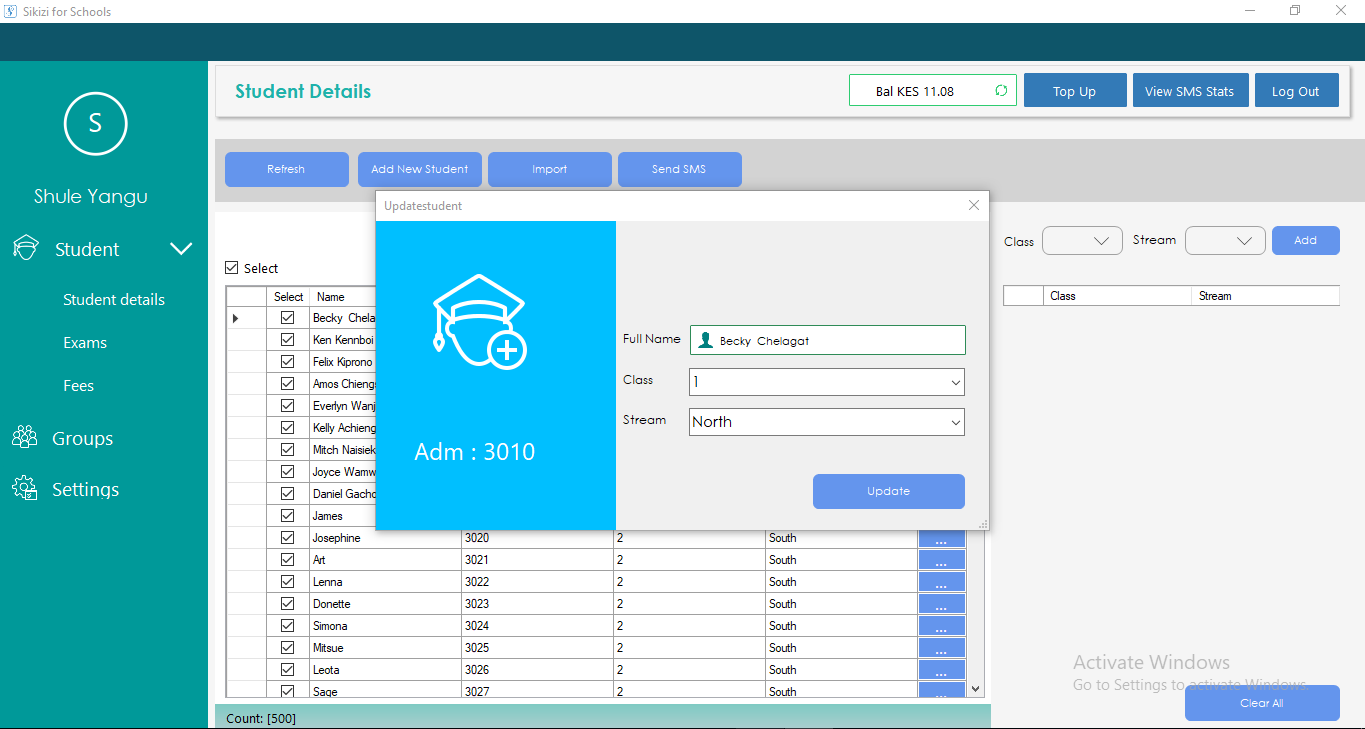
d) delete record: this deletes a student record from your database
4.4.How to add parent/guardian contacts
Without the details of a parent/guardian, Sikizi is not useful since it is a communication tool, right?
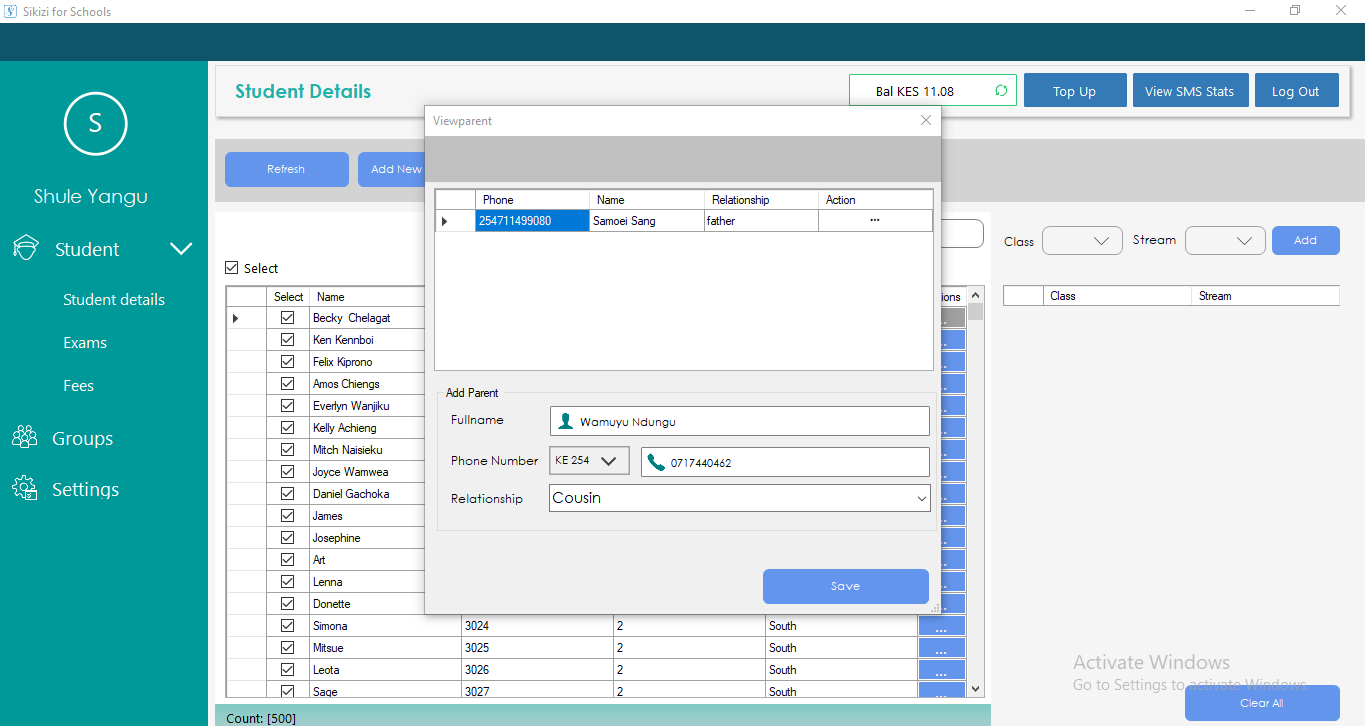
The contacts are the primary details in the system. So, in our list of students added, there is a view parent button.
This enables you to add as many contacts as you want the message sent to for that specific student. Each student should have at least one primary contact and any number of secondary contacts.
Let us add contacts for the student in the first row. Follow the steps below:
- Click on View parent,
- Under Add parent, add all the details needed and click save.
4.5.How to add Filters / How to filter contacts
Sometimes you may want to communicate to a single stream in a specific class and you will need to use the advanced filters.
In this example, we added CLASS 1 streams North, East, West and South students to our system. In a case where you wish to communicate to parents of CLASS 1 stream North students, this is how you go about it.
- Click student details tab on the left panel.
- On the right, there is a panel where you filter the student contact list. Select Class 1, Stream North and selectAdd. These filters all the students in Class 1 North.
 In case you want to filter class 1 stream north and south from our students list, then on the right panel select class 1 stream South and click add. You notice that our list will only have students from class 1 North and South.
To send a message to these contacts, click Send SMS.
- To remove the filters, click clear all button at the bottom right and we have all our students again. That was easy right?
5.How to send SMS to all your contacts
In sikizi messaging for schools, you realize that all contacts added are under the student details tab. In order to communicate to all contacts in the system, e.g. sending an event reminder, you have to create the SMS yourself. Let me take you through the process.
- Navigate to student details on the left panel and click that.
- Since we are sending the message to all our contacts, we need to select all contacts, then hit the Send SMS button
- Now we need to create the message ourselves. In this case we will create an event reminder message. On the very left, you see the contacts we are about to send our message to. At the centre, we are required to compose our message with title, template, and the message text.
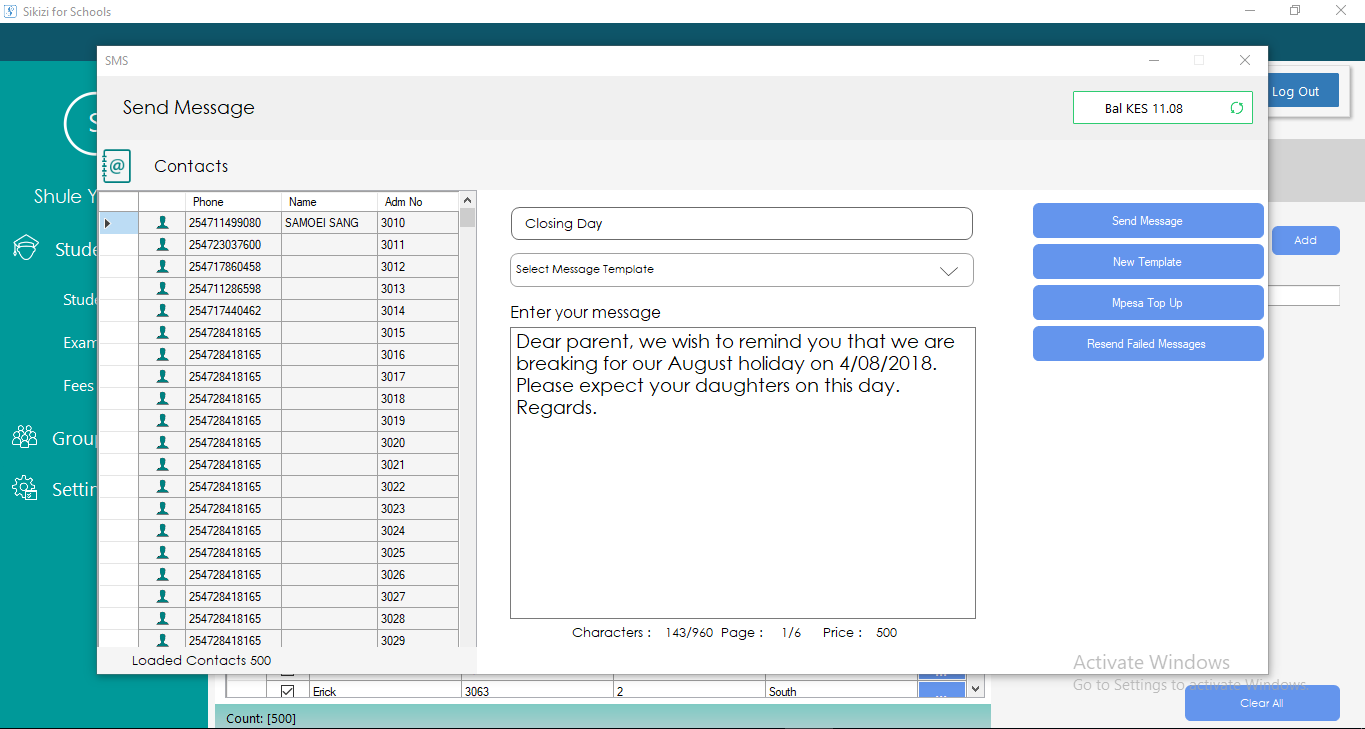
- Hit the send button and your message will be automatically sent.
6.Manage Exams
How to add and send exam results to parents
Nowadays exam report cards are not sent to parents via post office, but still we need to get the exam results delivered to parents in the earliest opportunity so as to involve them in gauging and mentoring the student in their daily progress at school.
Sikizi comes in to help avoid such delays and parents can receive their student’s exam results as soon as they are processed.
Below are the steps that will take you through on how to add an exam to the system and finally send exams results to respective parents’/guardians’ contacts.
- Click on the Exams button under Student details in the left panel.
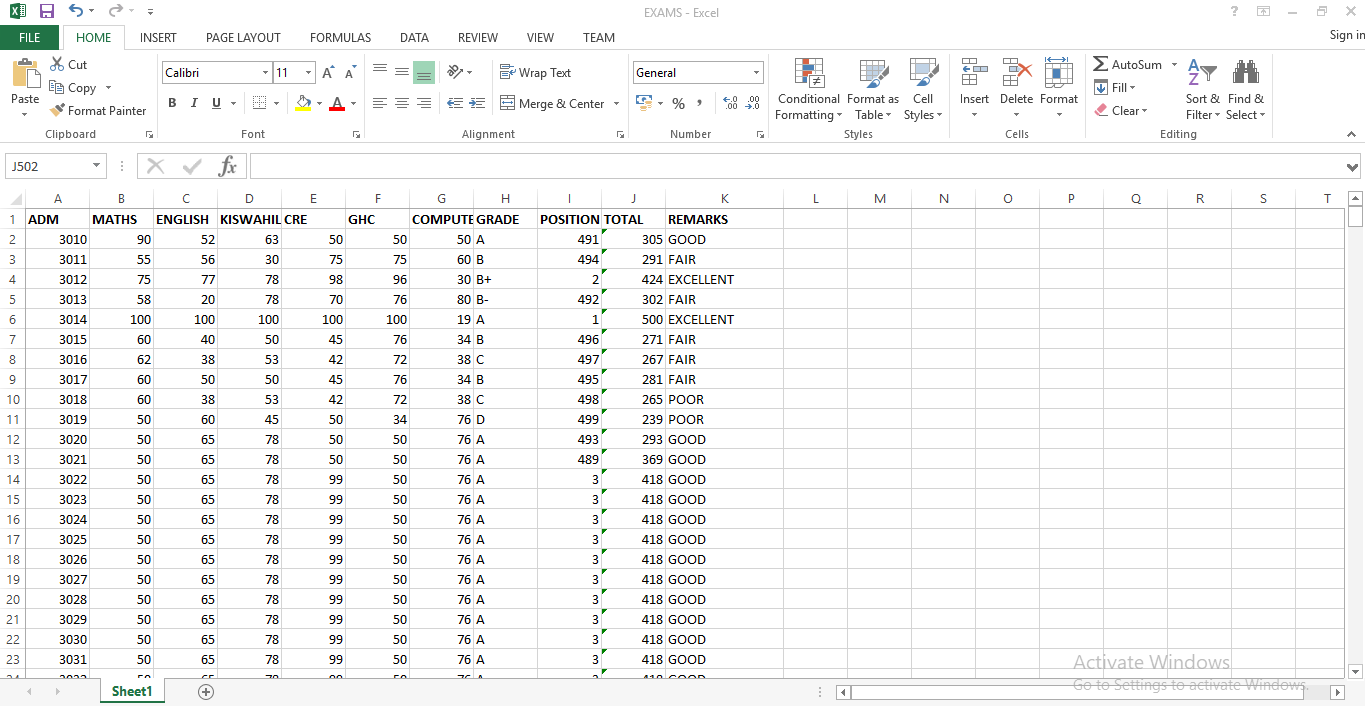
- You realize that there are no exams in the system yet. So we will create a new exam that is retained in the system. Here we need an excel file with all the subjects and marks against a student. Let’s first prepare the file. We need Student Admission No., Subjects marks, total, grades and position. Feel free to add any other column you may want included
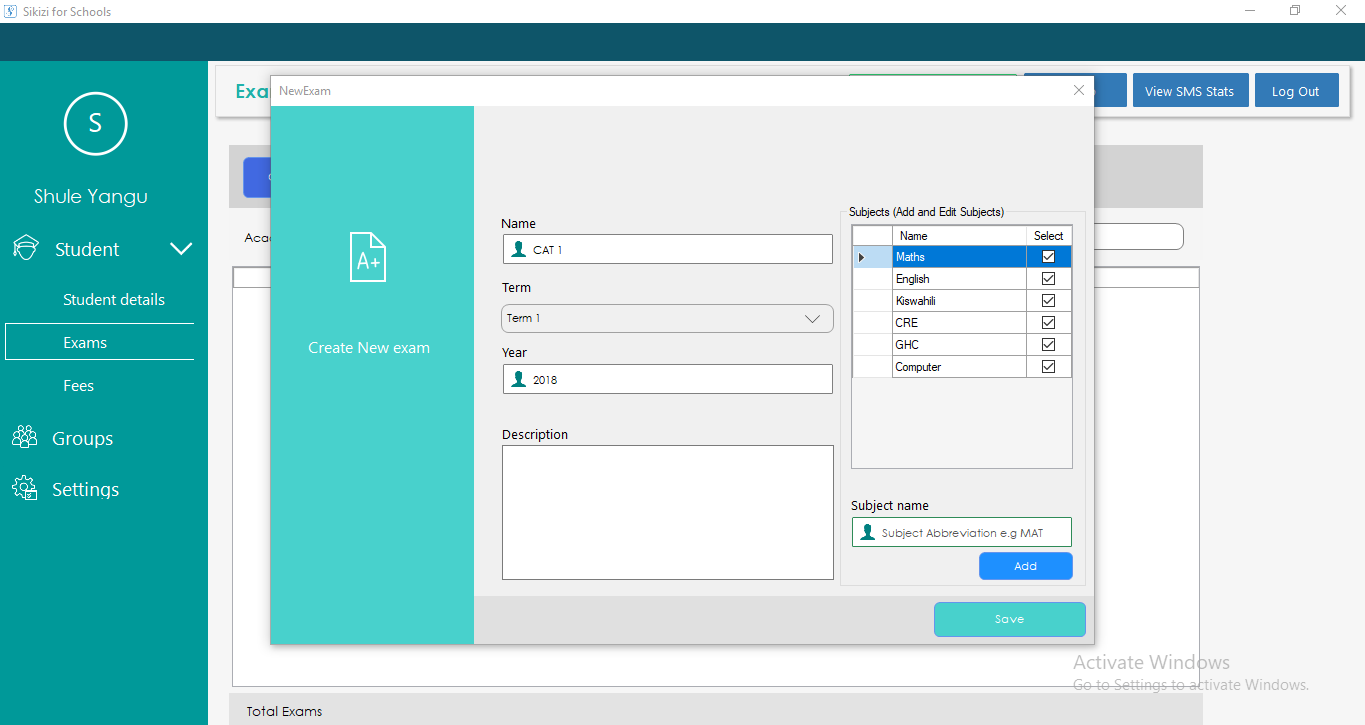
- Click on Create Exam button and you will be required to add all the details about the exam. Note that you also need to add the subjects done for that exam. Make sure to check all the subjects included in our excel file. In case there is a subject that is not in the list you can add it. Click save and continue.
- After clicking save, you realize that all your columns are mapped to what the exam you created expects. click finish and the results are successfully added to the system. These means we can now send these exams to the respective contacts. Click on action at the very end of the exam you just created and a context menu with view exam,edit record and delete record appears. In order to import the excel file we created, then click view exam then Import results.
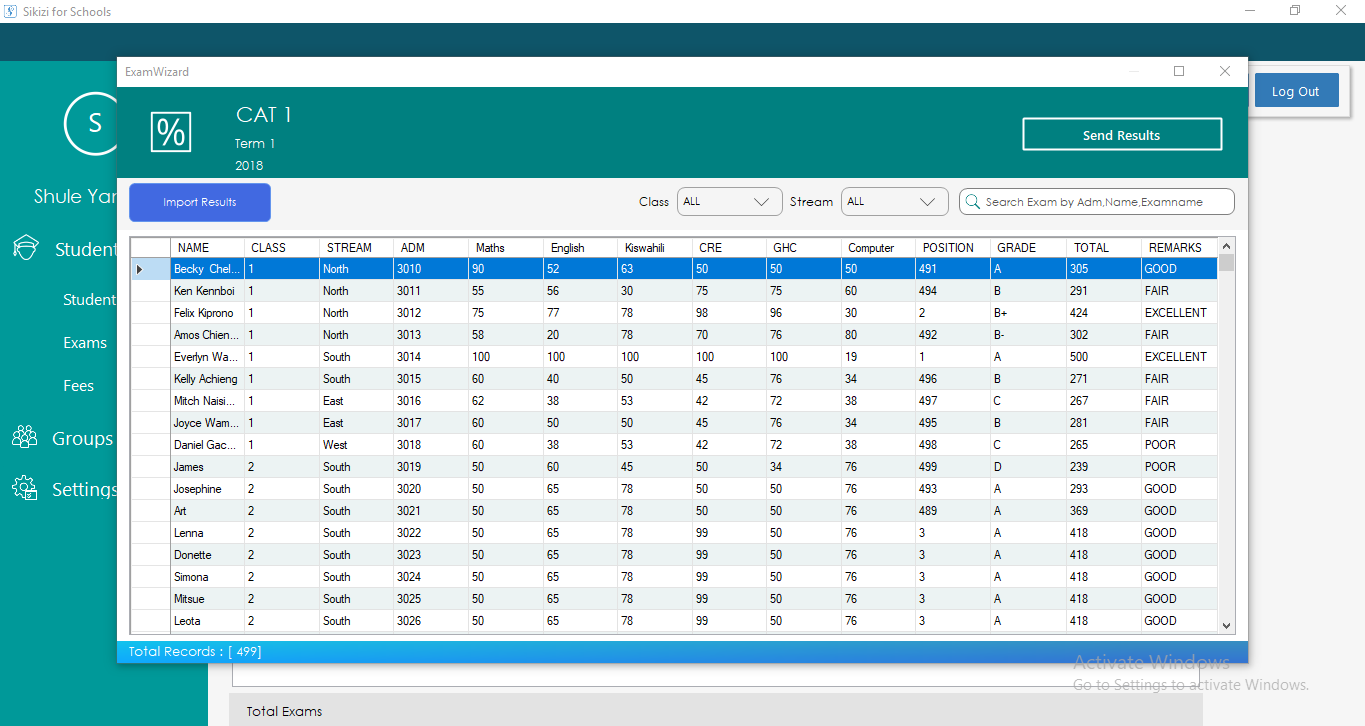
Click the SMS Results button in the above window and the results will be received by parents for respective students.
7.Manage Fees
Before uploading the fee balances, you need to prepare fee balances for each student on an Excel sheet. The Excel file must have the following columns.
- Student’s admission number (ADM NO)
- Fees balance amount (AMOUNT)
Below are the steps to follow in order to achieve that.
-
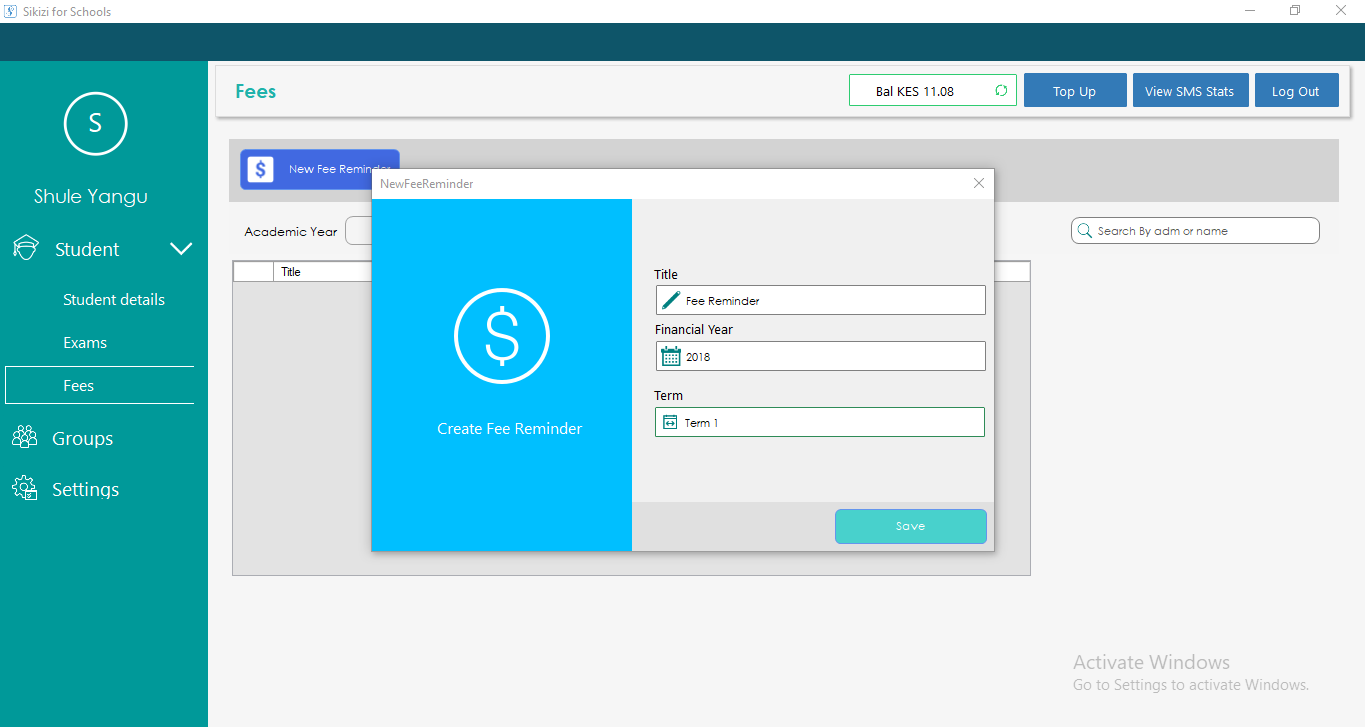
- Under students details tab on the left panel, click fees button and then new fee reminder Add the fee reminder details required (title, academic year and term) and then click save.
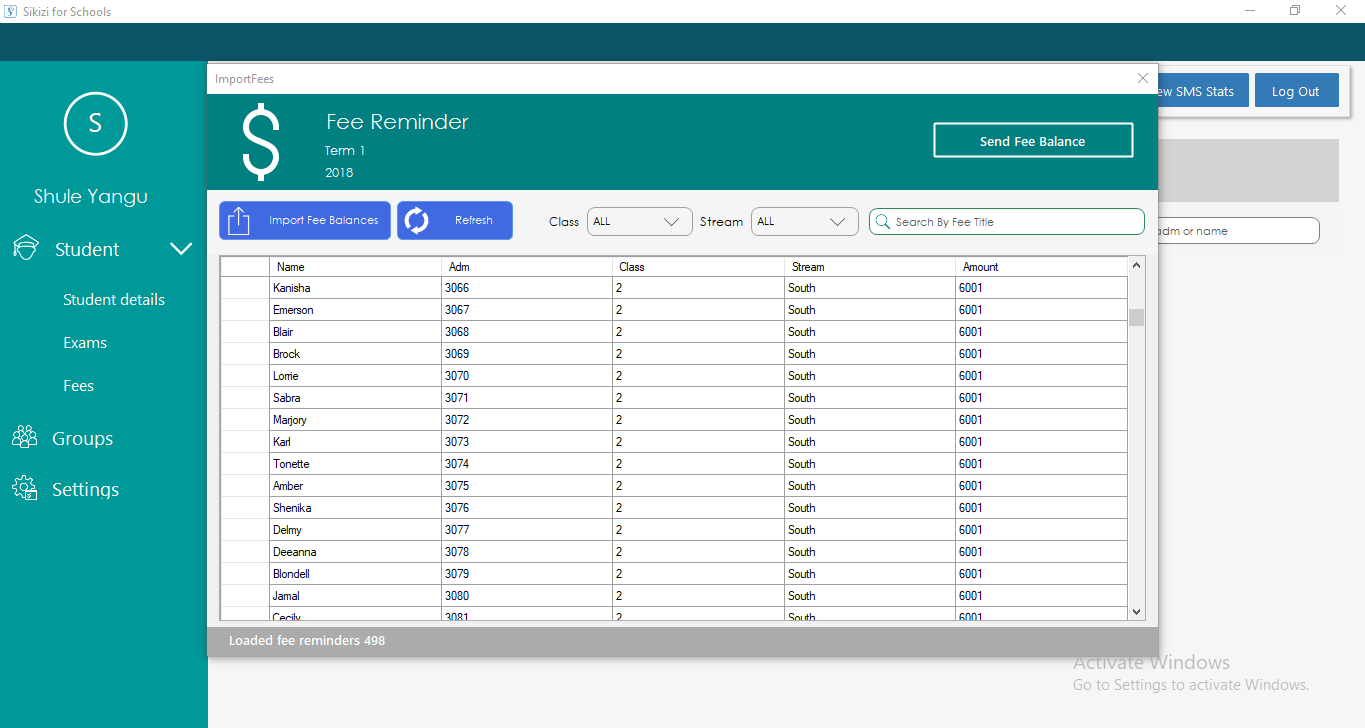
- Close that window and then on the very end of that fee reminder added, click on the More Details We are required to import an excel file with the admission number of the student and the amount. Prepare an excel file.
- Now click on import results after clicking more details. Choose your excel file, map the columns and click finish.
- Under students details tab on the left panel, click fees button and then new fee reminder Add the fee reminder details required (title, academic year and term) and then click save.
8.Manage Group
A contact Group contains a number of contacts in it.
This is suitable in cases where a school requires to relay their massage to few stakeholders at once. I will take you through the steps of creating a group, adding contacts to it and finally sending a message to the group. Below are the steps:
- On the left panel, there is a tab named Groups. Click to open the window.
- You realize that there are no existing groups in the system. Click on new Group in order to create one.
- Here you will provide a name for the group e.g. Non-teaching staff and click Save.

Having successfully created our group, we need to add contacts to the group.
8.1.How to add Contacts from an excel file
- Click on more button to the right of your added group.
- A new window opens and here we can import an excel file with our contacts or add them manually one by one. In case you have a group with few contacts, you can add them one after another.
- Lets import an excel file with two columns [NAME and PHONE NO.]
- Click Import and upload this file. Map the columns with expected columns
- Click on save and your contacts will be successfully added to the group. This is a repetition of the process we did for to add students.
8.2.How to add contacts to a group one by one
As we had said earlier, you can add contacts to the group one after another. Let us create another group and name it Suppliers. Then click on the more button in that group and add new contact in the window that opens.
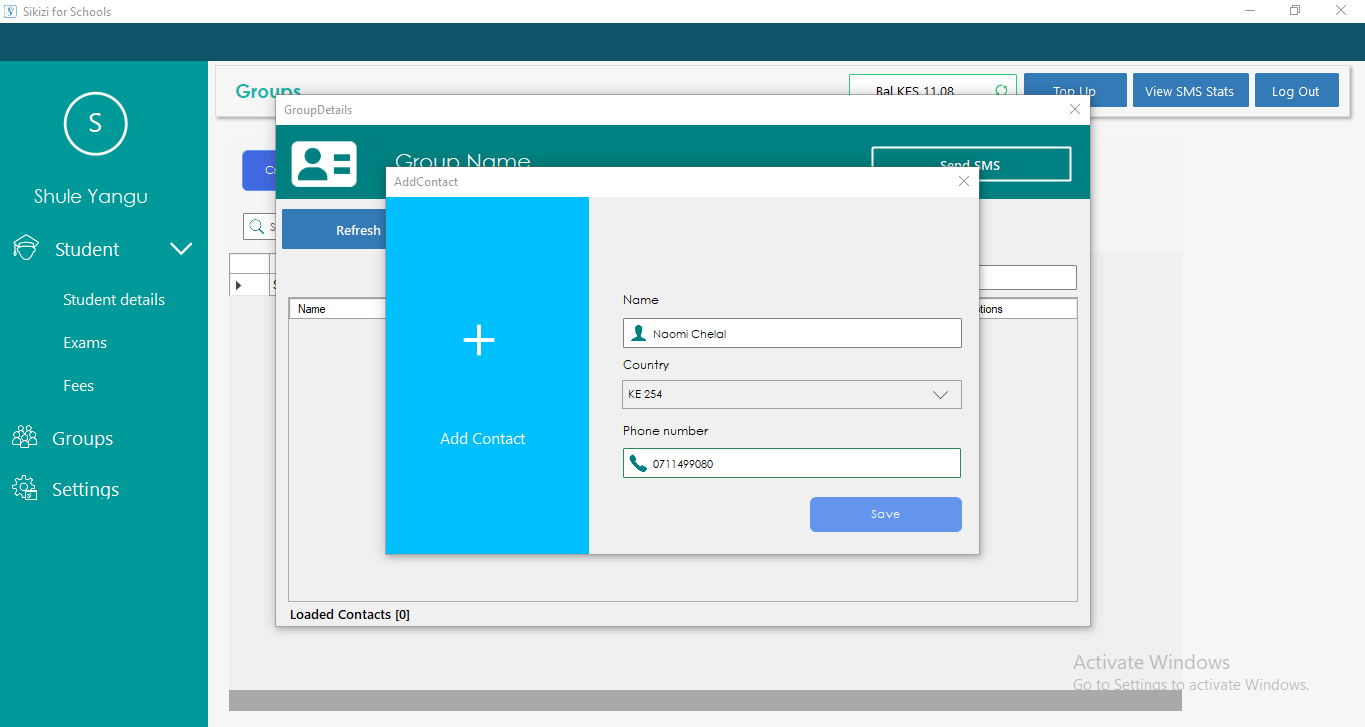
Click on save and your group now has one contact. Repeat this process until all your group contacts are successfully added.